It’s time we get creative, Stop Cutting Trees And Build Your Own Christmas Tree, even if it’s out of pine cones, wine corks, and fairy lights!
The Earth Is In Need Of Planting Trees And Not Cutting Trees Down
As many of us know, or perhaps don’t know, trees absorb and store carbon dioxide.
If forests are cleared or even disturbed, they release carbon dioxide and other greenhouse gasses, something that is wreaking havoc on the rapid exhilaration of climate changes we are all experiencing.
Stop Cutting Trees And Build Your Own Christmas Tree
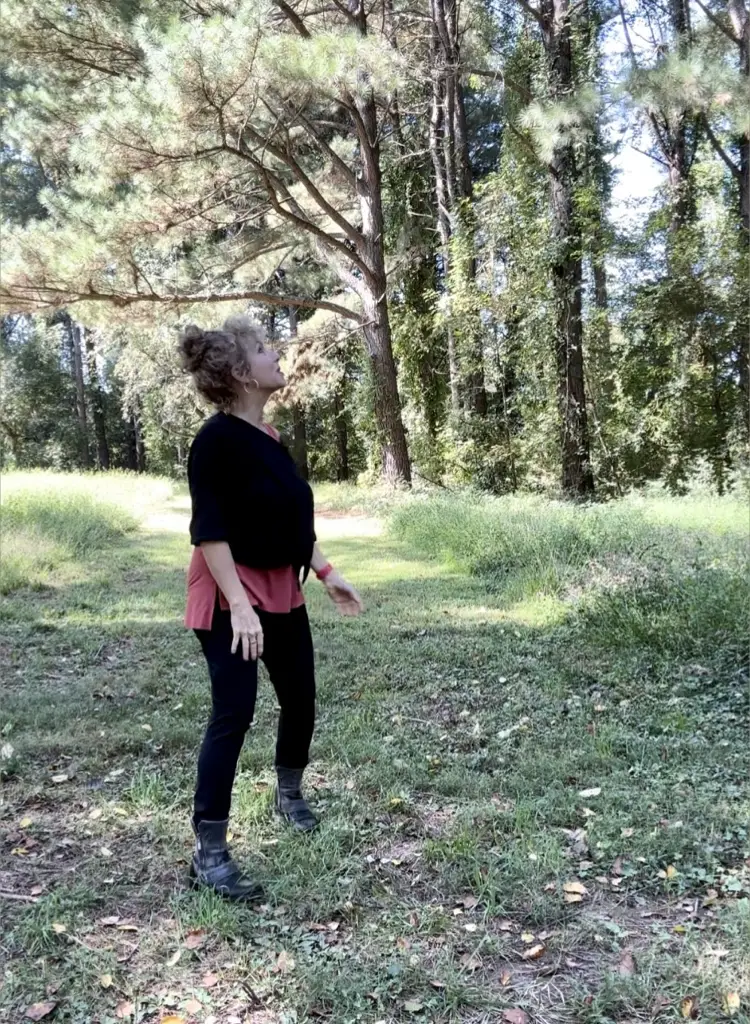
I can’t justify cutting down another Christmas tree this year, especially when my son is working to plant a Billion trees by 2030.
Rapid Reforest, the non-profit organization my son is the founder of, has already been embraced by the Brazilian government, Tree Nation in Spain and Grant government organizations here in America.

Especially for this reason, mama will not be cutting down anymore trees; and so this new art project was born through my husband and myself.
Stop Cutting Trees For Dumb Stuff!
Of course we all love to create holiday spirit in our homes, no matter what religion we are (or none), with the presence of the traditional tree.
But why do we have to have a fresh cut Christmas tree every year, only to toss it out along with our trash, a month later.
Sure, when my kids were little, I always took them to the Christmas tree farm for the holiday memory of selecting, cutting and taking home a little bit of magic to bring the spirit into our home.
The whole family would pile into the car, head out to the local farm for the live tree that would, be cut to kick off the festive season.
When they got a little older, the excitement still filled the home, even if we just set out to buy a pre-cut tree.

Plant A Christmas Tree
One year, when we had a yard that had room to actually consider planting a tree, we tried something new; a live tree, like a real live tree with the root bulb still intact.
The first time we did this, we started with a small tree, placed it in a galvanized bucket with a gallon of water in it, on top of a wooden crate covered with a drop cloth, to elevate the tree.
Once we draped a festive tablecloth around the bucket and were careful to string lights that would offer light, but not many so as not to dry out the branches, it looked wonderful.
The water level was something we had to remain mindful of throughout the holidays because we wanted the tree to remain alive so we could plant it later.
It really drank up a lot of water.
Since that was many years ago, like many, I drove by the house recently to see if the trees we planted three Christmas seasons in a row, were still alive.
Sure enough, they were twice as tall as I am now, which rekindled the memories!
What Is It About A Christmas Tree?
Of course we all know that a Christmas tree has nothing to do with Christmas.
In fact, it has become more of an interior design statement that gives us a place to exhibit our favorite ornaments, switch on the lights and create a bit of bling and magic.

I suppose it really doesn’t matter if it’s a tabletop tree for a small apartment, of which I have had when that was all I had room for, or a larger tree made out of anything that resembled the shape of a tree.
Around the holidays, lots of stores sell a lovely Christmas tree shaped rosemary bush, or other herbs, which smell fabulous and can be planted in the garden later.
Also a great time to purchase a small bush you will plant outside later, or keep in a large pot indoors.

How About An Artificial Tree
There I was, the holiday season had arrived and I was living in ‘hot as hell’ Brazil for Christmas!
Alternative Christmas tree ideas were something I never had to think about, but like everyone else, I wanted Christmas bling in our apartment.
I bought my first artificial tree, and since it was South America, the faux tree options came in different colors, so I chose white, since for sure I wouldn’t be seeing snow that particular Christmas.
Our apartment was lovely, but small, and so the only place a tree stand was going to go, was on top of something in the living room.
A tabletop Christmas tree, a desktop Christmas tree, or how about a ‘bar top’ Christmas tree, why not?

Back here in America, long before Halloween has arrived, we already see artificial Christmas trees everywhere.
It already inspires the mood for the seasons that are about to unfold, and so why not indulge in the magic while we can!

So Why Not Build Your Own Christmas Tree!
Let’s face it, we are really just looking to create the ambiance of a traditional Christmas tree, so why not a DIY tree, so long as it has a Christmas tree shape!
With lots of alternative DIY Christmas tree ideas, from a bunch of pine branches stuck into a styrofoam cone, to a bunch of wooden dowels from a craft store, glued to an angled line, wooden base for a modern look.
However, this year, I’ve decided to do something a little crazy.
Since I have a 9-foot high area that could fit a tree, one that could also become an artsy focal point for the remainder of the year, a statement piece, I came up with an idea I needed to sell the hubby on, especially since it was going to become a joint project!
An Easy Project If You Have The Right Tools
Luckily, at this stage in my life, I live in a large home with a garage that has all the tools I love to dabble with.
Yes, I dabble with tools, just as I have always dabble in lots of DIY projects in my home.

When we bought this home, I wanted to save the money it was going to cost to replace kitchen cabinets, to use elsewhere in the house, so I told hubby we are going to use white chalk paint and paint them ourselves.
Here we are eight years later and they still look good!
I grew up with a step-father that was a commercial builder, and since my mom only had us four girls when he married her, he taught us girls various aspects of the building business.
While one of my sisters took to laying bricks and house painting, it was all the power tools that interested me. Not very ‘girlie’ back then, but totally normal now!
Plan The Design
At first I was thinking to use wooden dowels that could be inserted into a central wooden pole, with holes drilled at an angle, to place them.
That quickly became too complicated.
Since the space would allow for something tall, but couldn’t have a diameter wider than 4-feet, I went back to the concept of wood boards somehow attached to a central pole.
Off to Home Depot hubby and I went with a plan and some figures on paper.
My First Wooden Christmas Tree
Since it’s mid-October, we have plenty of time to construct this unique tree that is going to remain up all year!
The idea is to use slats of wood that are 3.5″x1″ to cut with a circular saw, into incremental lengths that will start at 36-inches and will become progressively shorter until we reach the tree top.
We decided on a new product called ‘Pink Rebar’ to use as the center pole. It has incredible durability not to bend with the weight that will be stacked all the way up the pole.
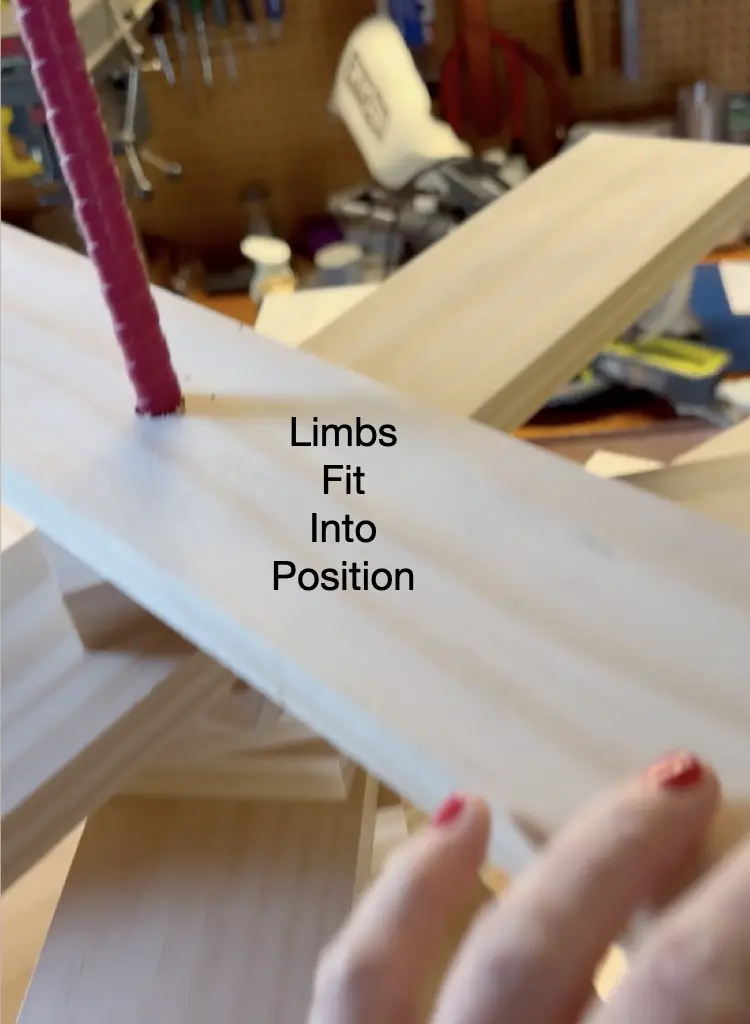
Which brings me to the next part; a hole will be drilled at the end of each slat of wood so that the pole can go through each one, creating a massive stack of varied lengths of wood that have a swivel ability.
At first hubby wanted to stack them one on top of the other, which would have had a very dramatic effect for sure.
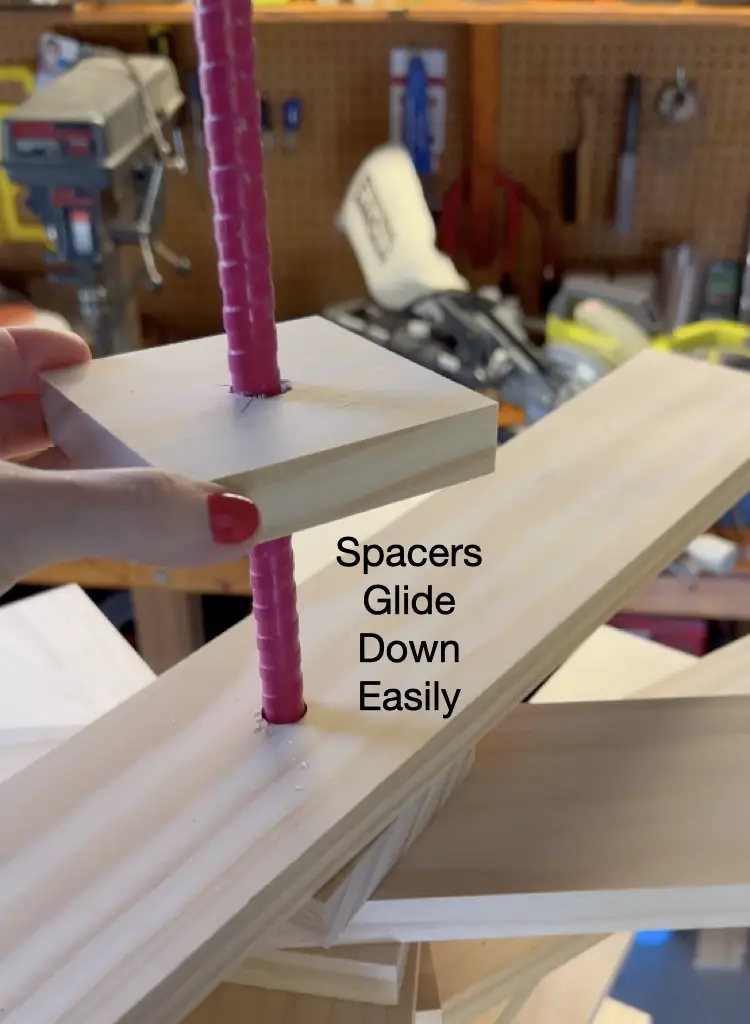
But I felt there needed to be a spacer placed between each board, offering both visibility down the center of the tree and an easy way for me to place a string of lights around the center of the tree.
And so, a spacer it is; thanks hub for trusting my mind’s eye!
Build Your Christmas Tree – Episode 2
While the branches of this tree construction are coming along, the biggest obstacle has become the base.
Creating a sturdy, heavy base that will stand up (literally), to the weight of the 9-foot structure, is were this project is at this time.
Creating A Base For The Tree
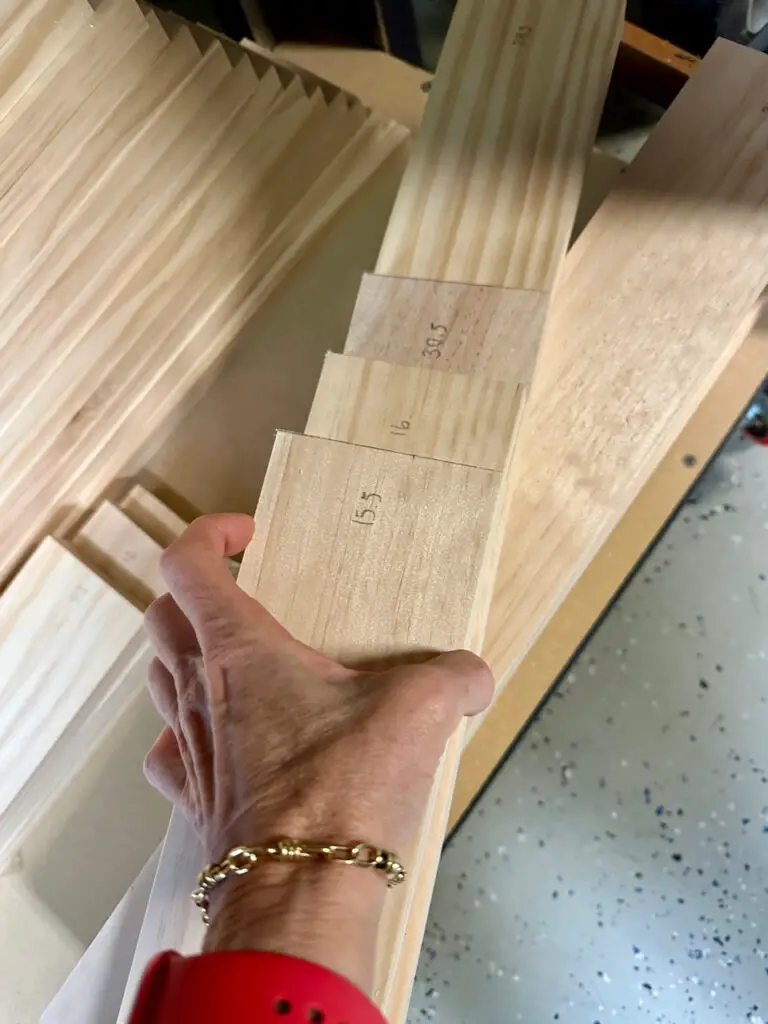
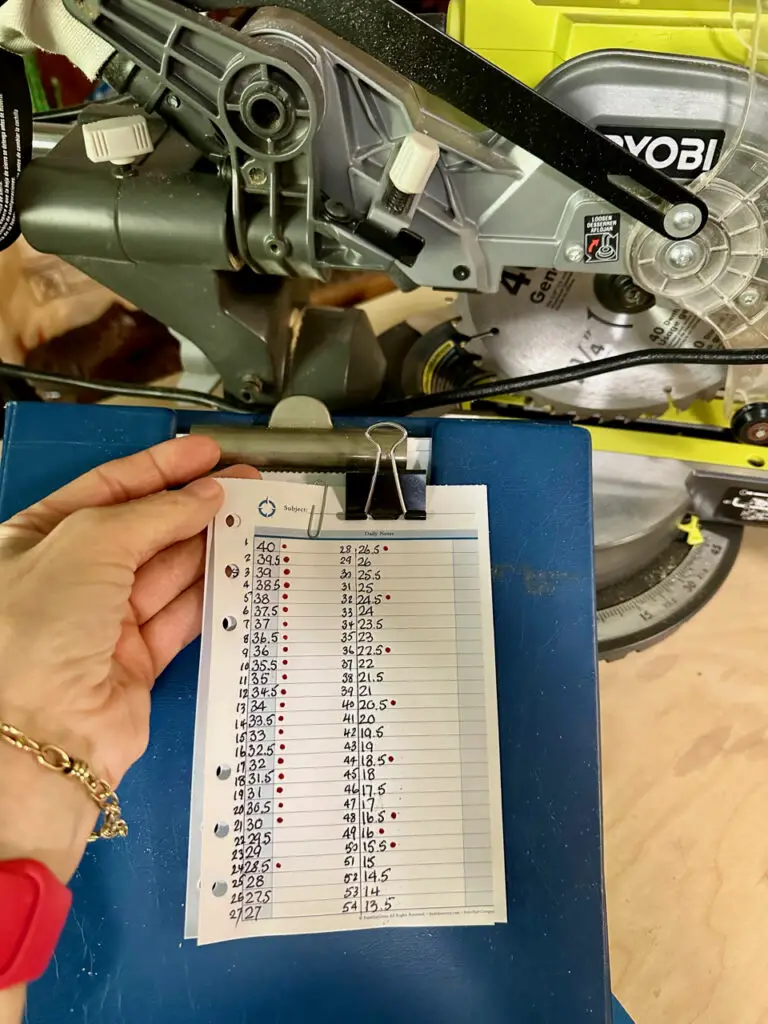
As you can see in the photo above, each branch will start at 40-inches long, and reduce in length by half an inch, finishing the top branch at 13.5-inches.

Remembering also, that a spacer of wood will go between each base, limiting the number of boards, by half, and cutting back on the weight.
However, the base still needs to be able to hold the structure perfectly, especially since this tree is also going to become a permanent piece of art in my 20-foot high living room.
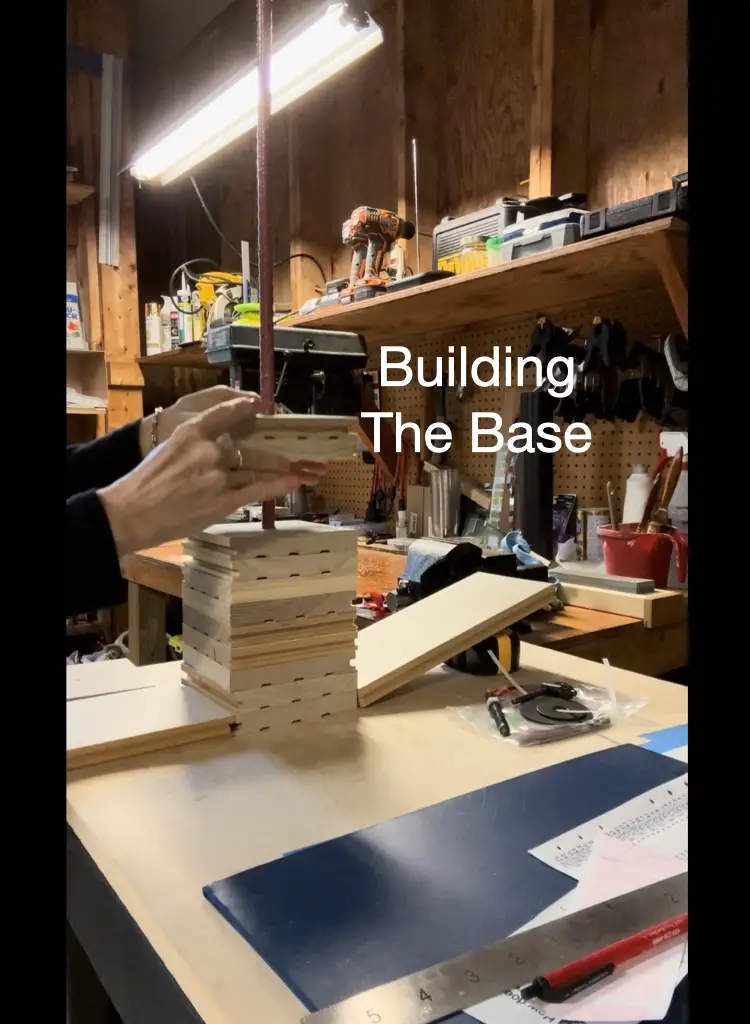
Base Structure
Working with 5-inch square pieces of wood, stacked a foot tall, with the rod going through the center is the beginning of the base.
It will then be framed on all sides with a solid piece of wood, so that the stacked layers are not visible, yet offer the weight needed.
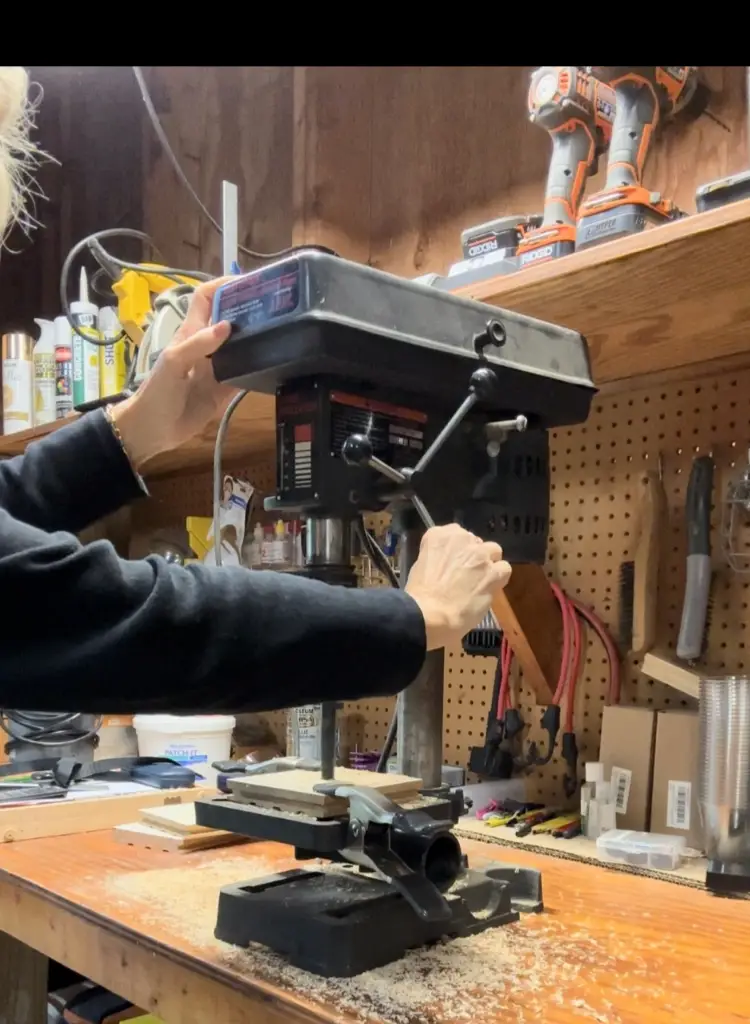
Drilling a precise hole through the center of each of the branches and now the base structure has been made easy with the use of a very affordable tool called a Drill Press. A perfect gift for the up and coming holidays, for sure!
The drill press in my video is about a hundred years old, made by Craftsman and this model no longer made, however the drill press by WEN has received great reviews.

Branches Are Cut
Each of the varied lengths of branches have been cut to precise measurements.
Once the base is constructed, the spacers will need to be cut (easiest part), and then we move into painting.
I am thinking to go with a wash of paint and not a solid color, and probably will choose silver and gold, since it works best with my decor.
However the sky’s the limit, as well as your imagination, as to the way you might go about choosing color, or not, for a wood structure such as this.
Stop Cutting Trees – Episode 3
The last and final stages before putting this Christmas Tree on display, which will also serve as a permanent structure of artwork all year, is happening.
Thank you for sharing in this amazing process, from concept to completion, and by completion I mean, this beauty is almost finished!
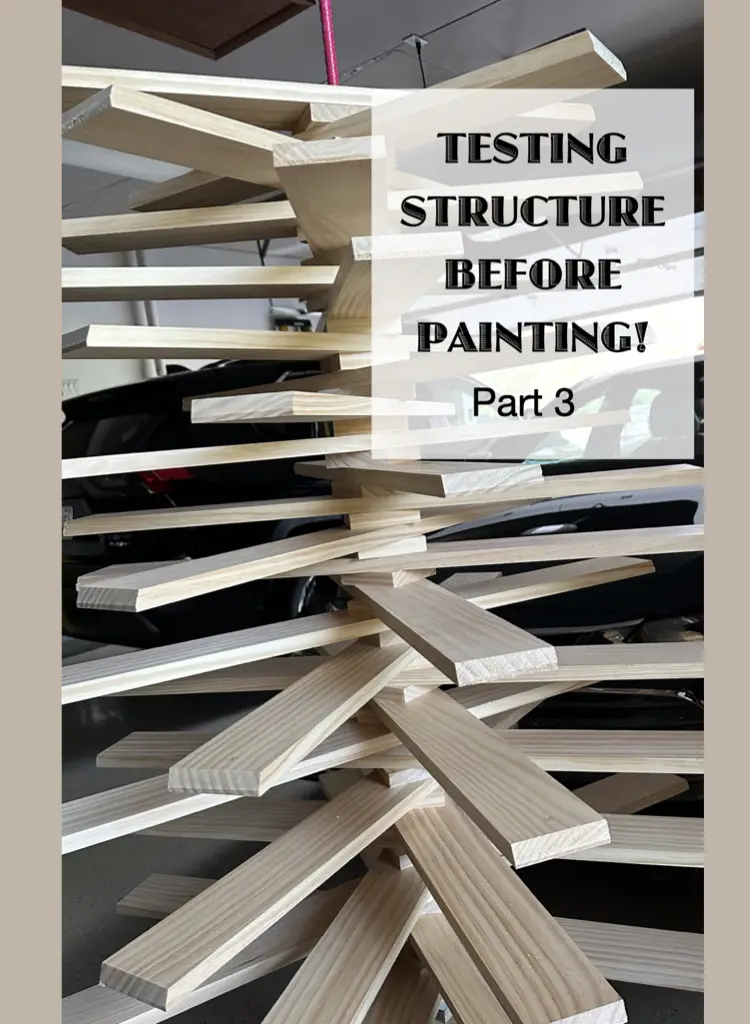
Test The Structure Of The Tree
Every piece was precisely cut, both limbs and spacers, and now it’s time to see how it stands before the final steps.
Each spacer was tested for easy glide and proper spacing.
Each branch, which has increments of half inch from bottom to top, are tested for positioning.
The assessment is to diminish width more rapidly as it nears the top; easy fix.
Consideration For Spacers And Limbs Of The Tree
Placing 3-inch by 3-inch spacers in between each limb lessens the weight of the tree and provides visual space between each limb.
The assessment is now to leave off spacers on the first four bottom limbs, creating visual density at the bottom, as well as weight.
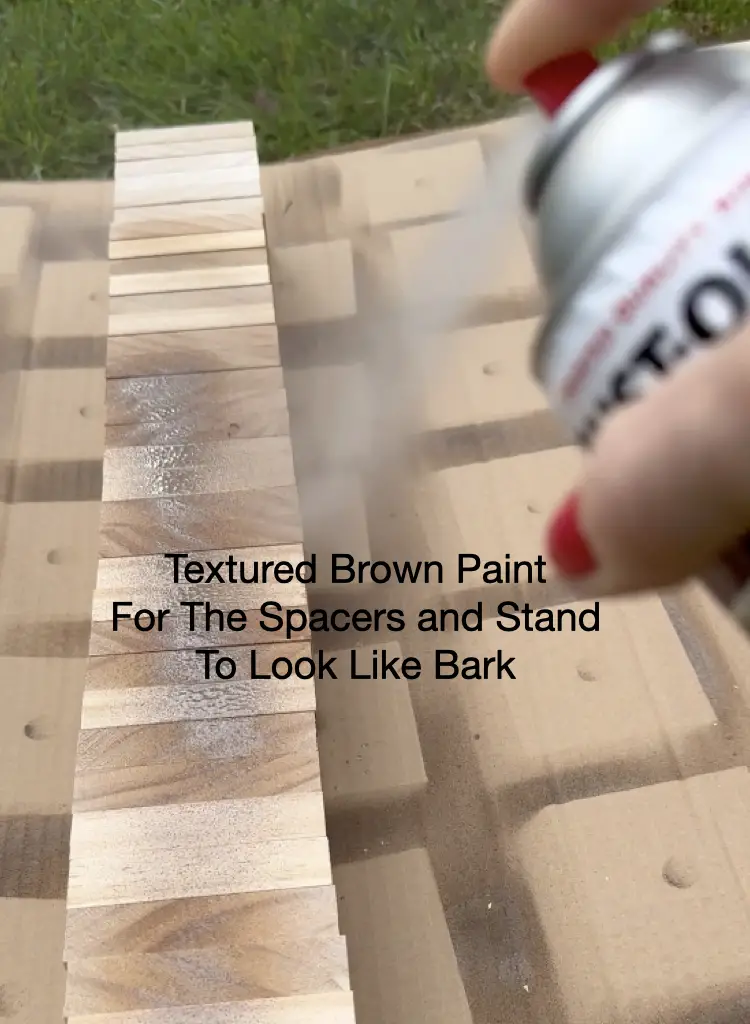
Time To Consider Painting Of The Tree
Choosing a textured brown spray paint, textured with sand, gives a nice finish to the spacers and the base.
The paint has the appearance of rough bark on a tree, therefore this paint was sprayed on the base as well as the edges of the spacers.
However, for the tops and bottoms of the spacers, I chose a walnut stain to give the appearance of a heavier wood, and still show the grain of the pine wood being used.
Paint chosen for the branches has been a metallic silver and gold to be brushed on, not a heavy coat, but rather one that allows grain to show through.
Just one coat on all sides of the branches, and then left to dry.

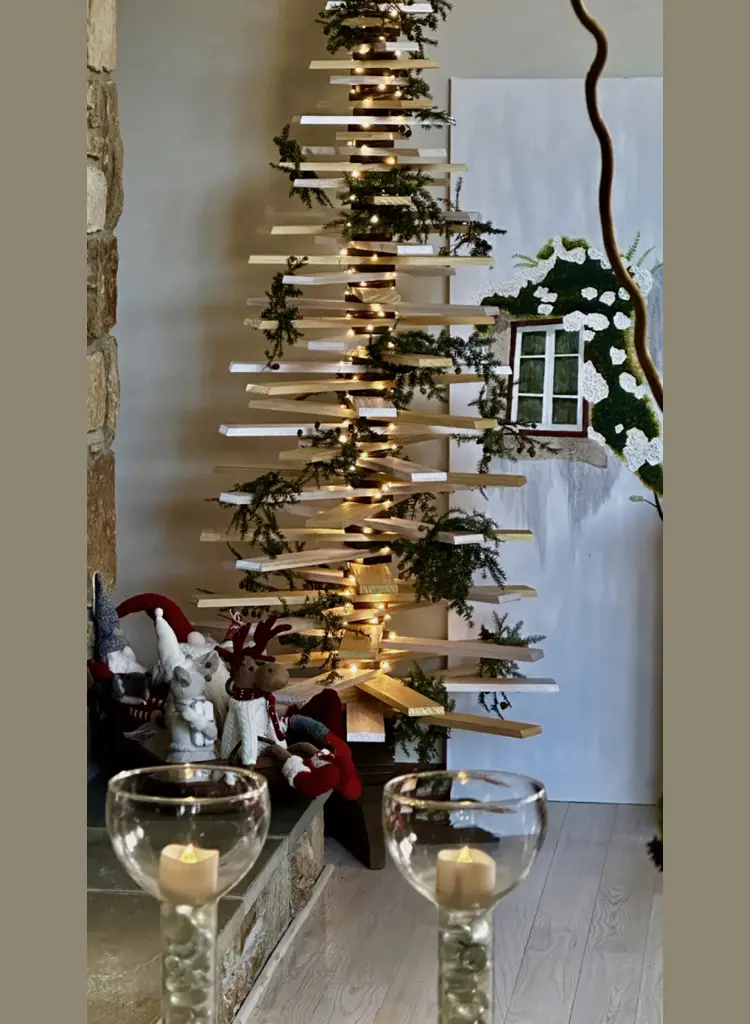
Christmas Tree Finale
Don’t you just love it when a project you created in your mind, is finally in front of you to see its completion!
The structure was tested and proved durable. Paint is dry and December is upon us, so the tree is now in its rightful spot for keeps!
Greens For A Wood Tree
Of course there needed to be that element of an evergreen tree for Christmas.
I just didn’t cut down a tree for a one month pleasure and then toss it in the trash.
Yes, the tree is build with lumber, but it will remain an art structure in our home and not something to toss come January.
Having gathered greens from trees in my yard I was able to wire them into tiny wreaths to place on the branches of the tree.
And hey… this tree doesn’t need water!
Stop Cutting Trees For Ornaments and Build Your Own Christmas Tree
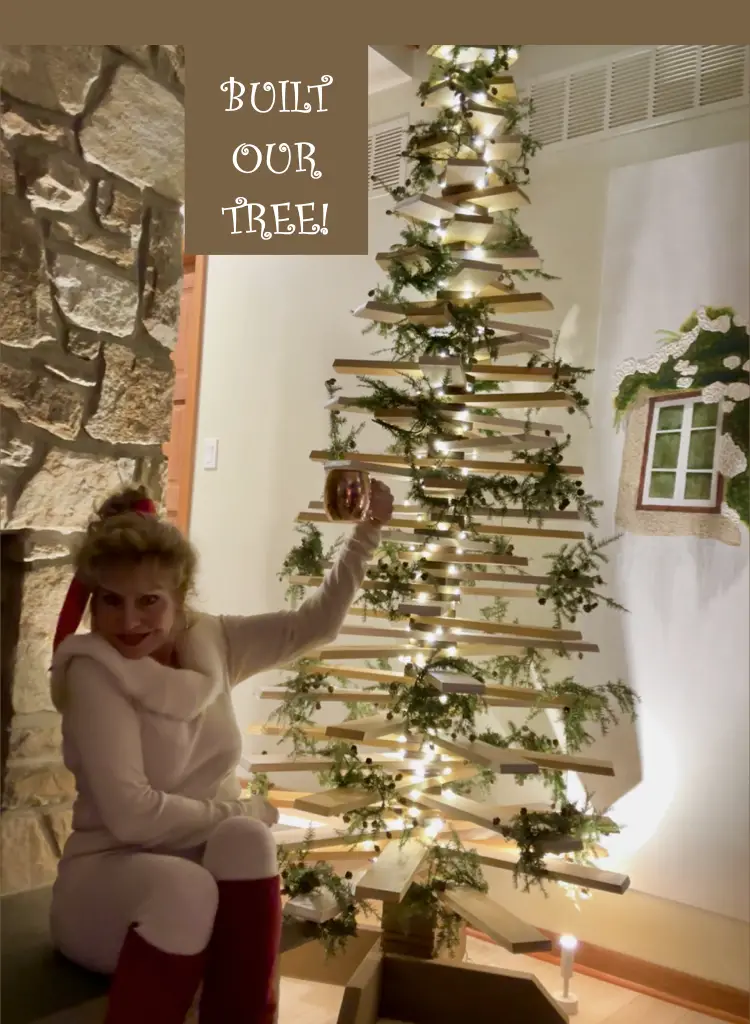
This project has brought me much joy, and along with my husband, we were able to create what I envisioned in my mind, put a few strings of fairy lights on, and fill the room with Christmas Tree magic!
While I chose to make small wreaths out of cuttings from greenery the tree looks lovely with lights alone.
If you have any questions about details of this project, feel free to leave me a message.
To see a quick view of the process from beginning to end, here is the video I’ve put together, which reminds me this was lots of detailed work, but came together beautifully!
Thank you for your interest in this creative journey. Don’t forget to come back in February and check out how it will look for the Love Month!
I believe the table... that place that draws people to gather, is the most powerful symbol of togetherness. All that happens before the table is set, the planning, the gathering, the preparing, are all an intricate part of the dance that create the mood of celebration to share with friends and loved ones.