These seasonal fruit tarts feature a buttery or coconut oil crust with your choice of dairy or non-dairy custard, topped with fresh fruit; strawberries, blueberries, raspberries or favorites.
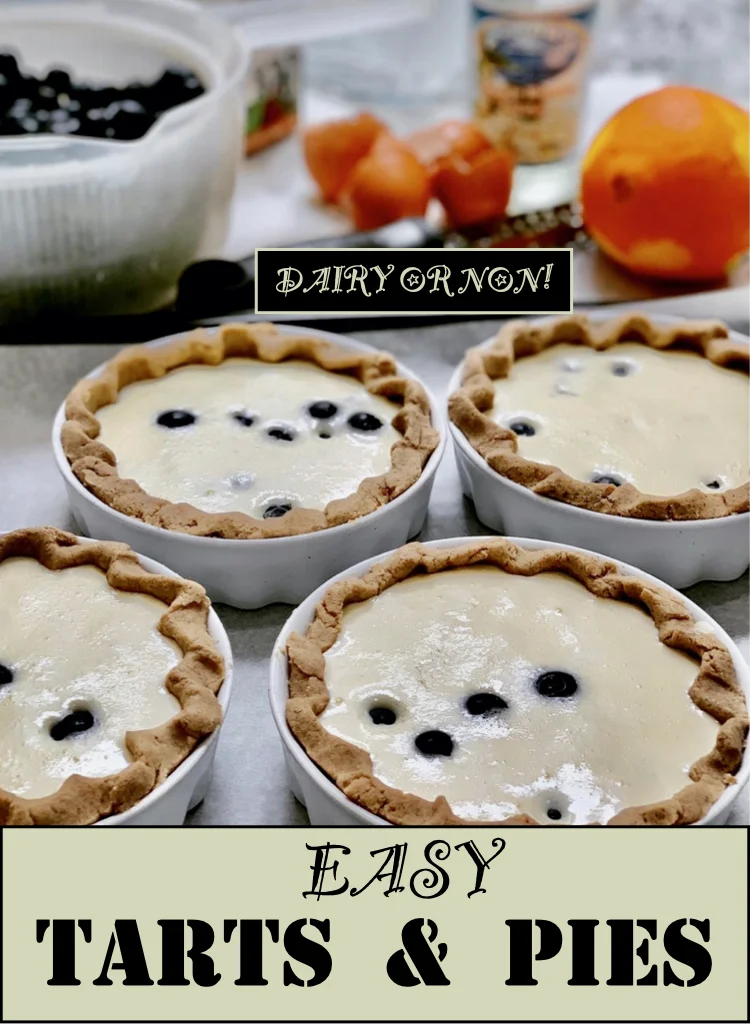
Seasonal Fruit Tart Recipes for All
There’s a certain moment in late spring, just when the air softens and berries begin to spill into markets, that calls for something simple, beautiful, and just a little indulgent.
A tart is exactly that.
Not fussy, not overly sweet, but quietly stunning. A crisp, tender crust. A creamy filling that can lean rich or light depending on your mood. And fruit, always the fruit, arranged generously, imperfectly, like something gathered rather than styled.
This is a recipe meant to bend with the season. With what you have. With how you gather. With what you prefer.
Whether you choose mascarpone for a classic richness or coconut cream for something lighter and dairy-free, these small tarts become whatever you need them to be, an afternoon treat, a brunch centerpiece, or a quiet dessert at the end of a long day.
Why You’ll Love These Seasonal Fruit Tarts
These tarts are designed for flexibility and simplicity:
- One crust, multiple variations
- Dairy and non-dairy custard options
- Perfect for strawberries, blueberries, or raspberries
- Easy to make as individual tarts or one large centerpiece
- Beautiful for entertaining, effortless for everyday
What Is The Difference Between A Pie and A Tart?
The simplest distinction is that a pie has filling inside a crust (usually), while a tart is more like an open-faced pastry with filling sitting in a shallow shell. There is, however, the pumpkin pie, sweet potato pie and white potato pie (a heritage pie of Maryland), that is open-faced.
Otherwise a pie typically has both a bottom crust and a top crust. A tart has only a bottom and sides, with the filling exposed on top, which is what makes it perfect for topping with fruit.
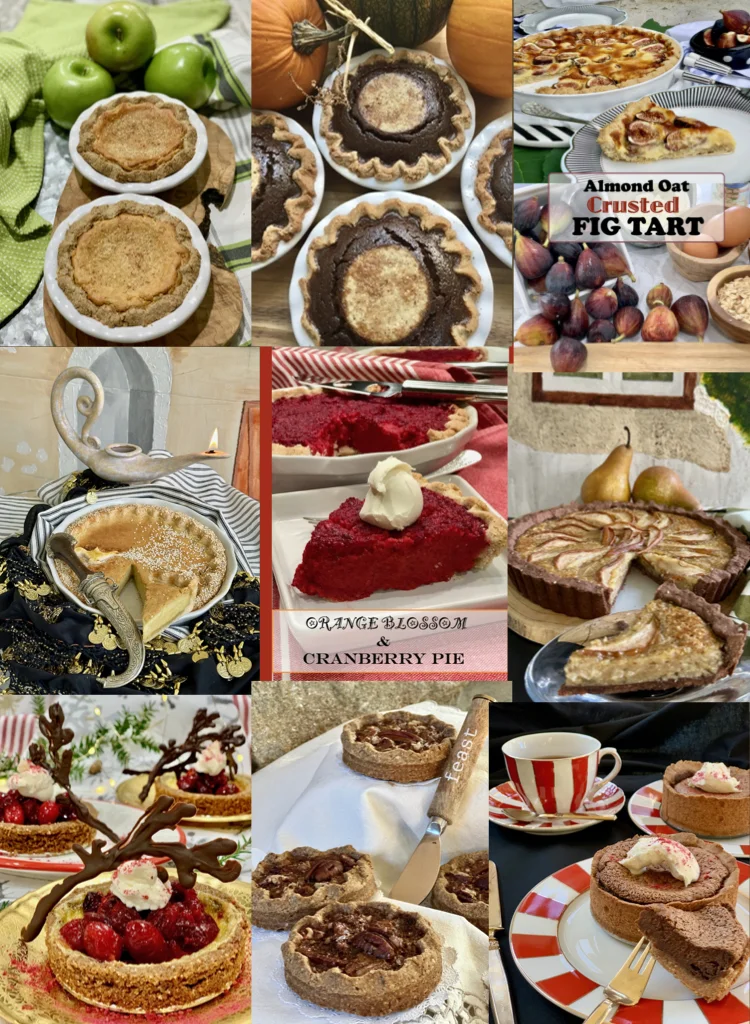
Once you’ve indulged in these seasonal fruit tarts, when autumn approaches you might want to indulge in some of my pies!
Choosing Your Custard – Dairy vs Non-Dairy
This recipe works beautifully with either option:
Mascarpone Custard (Dairy Option):
- Rich, creamy, slightly tangy
- Classic bakery-style flavor
- Best for strawberries and raspberries
Coconut Cream Custard (Non-Dairy Option):
- Light, subtly sweet, and aromatic
- Pairs especially well with blueberries and citrus zest
- A great alternative for dairy-free diets
Both bake the same way and hold their shape once cooled.
The Perfect Tart Crust (Buttery or Coconut Oil)
This crust is tender with just enough structure to hold the custard.
You can choose:
- Butter for a classic, flaky texture
- Coconut oil for a dairy-free, slightly nutty flavor
The addition of crushed nuts gives it a subtle richness and makes it feel more rustic and seasonal.
Best Fruits for Seasonal Tarts
Use what’s fresh and in season:
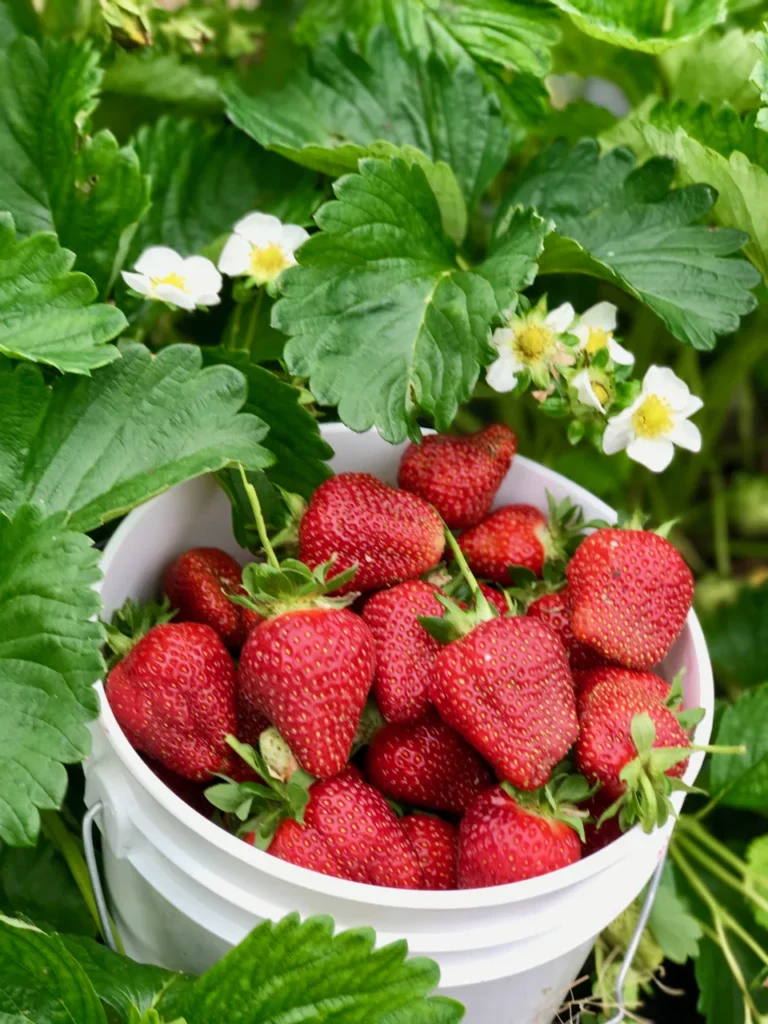
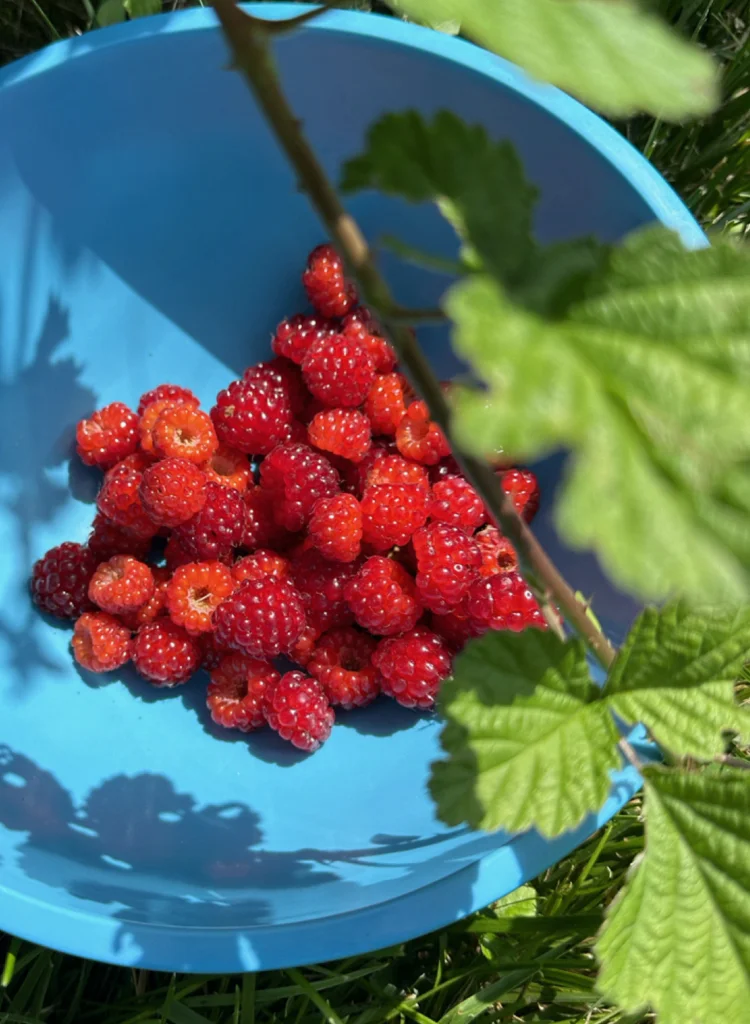
- Strawberries – sweet, juicy, and classic
- Raspberries – slightly tart, vibrant, elegant
- Cherries – sweet, tart, and definitely juicy
- Peaches – sweet and juicy
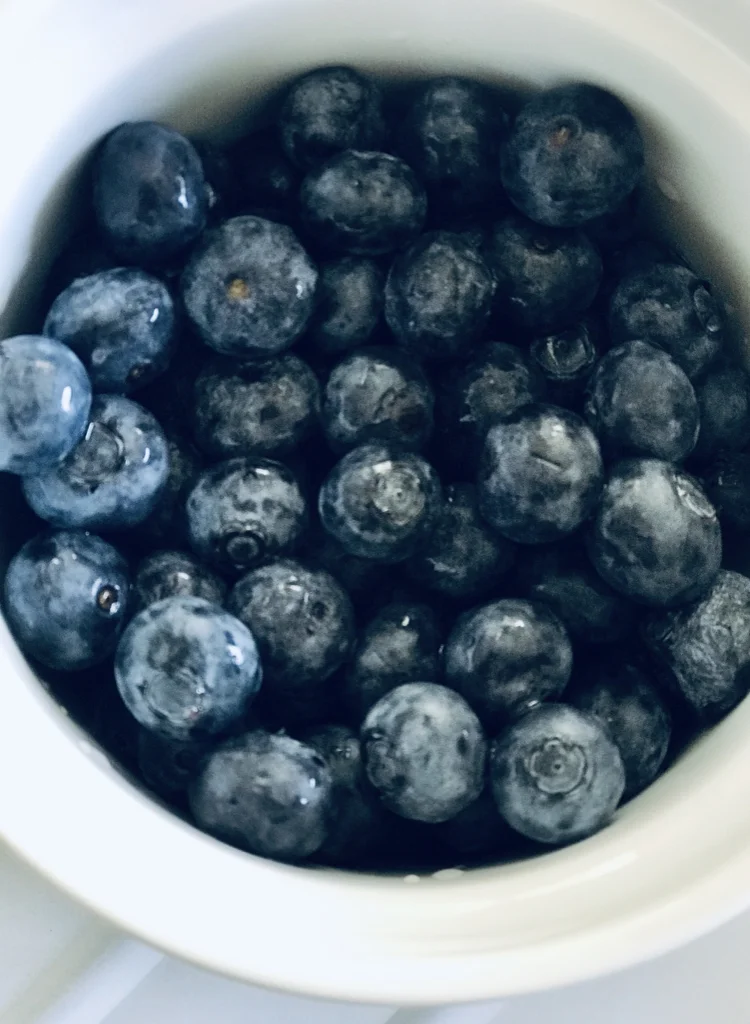
- Blueberries – mellow, jammy when baked
Ingredients for Seasonal Fruit Tarts
For the Tart Crust
For the Tart Crust
- Flour
- Butter or coconut oil
- Crushed nuts (almonds, pecans, or walnuts)
- Sugar
- Salt
- 1 egg
- Cold water
Why These Ingredients Work
A good tart begins with a crust that is both tender and structured, something that holds the custard without becoming heavy.
Butter or coconut oil – Butter creates a classic flaky tart crust with rich flavor, while coconut oil offers a dairy-free alternative with a delicate, slightly nutty finish. Both work beautifully depending on your preference.
Flour – The foundation of the tart dough, giving it structure while still allowing for a soft, crumbly texture. A gluten-free flour can certainly be swapped out for the AP-flour.
Crushed nuts – Adding finely crushed almonds, pecans, or walnuts brings subtle richness and texture, while also enhancing the crust with a more rustic, bakery-style feel, also adding a nutritious dimension to a tart crust.
Egg – Acts as a binder, helping the dough come together while adding a bit of richness and stability.
Cold water – Essential for bringing the dough together without overworking it. Adding it slowly ensures the crust stays tender rather than tough.
Sugar and salt – Balance the flavor, enhancing both the sweetness of the filling and the buttery notes of the crust.
For the Custard Filling (Dairy and Non-Dairy Options)
For the Custard Filling (Dairy & Non-Dairy Options)
- Eggs
- Mascarpone or full-fat coconut cream
- Sugar
- Pinch of salt
- Vanilla, orange blossom, or citrus zest
Choosing the Right Custard for Your Tart
This fruit tart recipe is designed to be flexible, offering both a classic dairy custard and a dairy-free alternative without sacrificing texture or flavor.
Mascarpone custard (dairy option) – Creates a rich, creamy filling with a slightly tangy finish. This option gives you a traditional French-style fruit tart filling that pairs beautifully with berries.
Full-fat coconut cream (non-dairy option) – A smooth and stable alternative that sets well when baked. It adds a light coconut aroma and works especially well with citrus zest and blueberries.
Eggs – Provide structure to the custard, allowing it to set softly while remaining creamy.
Sugar – Sweetens the custard while balancing the natural tartness of the fruit.
Flavorings (vanilla, orange blossom, citrus zest) – These elevate the entire tart. Vanilla keeps it classic, orange blossom adds a floral note, and citrus zest brightens the flavor for a more spring-forward dessert.
For the Fresh Fruit Topping
- Strawberries
- Blueberries
- Raspberries
Best Fruit for Seasonal Tarts
Fresh fruit is what transforms this tart into a seasonal centerpiece.
Strawberries – Sweet and juicy, perfect for a classic fruit tart look. Slice them for a more polished presentation.
Raspberries – Slightly tart and vibrant, adding contrast and elegance to the finished tart.
Peaches – Sweet and juicy, and caramelize beautifully if baked on top of the custard.
Blueberries – Soft and mellow, offering a deeper, jammy flavor that pairs especially well with coconut cream custard.
For best results, choose fruit that is ripe but still firm. This keeps the tarts visually beautiful and prevents excess moisture from softening the custard.
Optional finishes:
- Powdered sugar for a soft, bakery-style look
- Warmed jam glaze for shine and preservation
- Shredded coconut for texture and added flavor
Tools You’ll Need For Perfect Fruit Tarts
- Mixing bowls (various sizes)
- Food processor or fork
- Rolling pin
- Tart pan or mini tart molds
- Baking sheet
- Parchment paper
- Whisk
- Wire cooling rack
Why These Tools Matter (and How They Help You Succeed)
Food processor or fork – Helps cut the butter or coconut oil into the flour efficiently, creating that ideal crumbly texture needed for a tender tart crust.
Mixing bowls – Using separate bowls for crust and custard keeps the process organized and ensures even mixing.
Rolling pin – Allows you to evenly roll out the dough, which is key for consistent baking and preventing thin or uneven spots.
Tart pans – These help shape the dough and create the signature crisp edges. Mini tart pans are especially useful for entertaining, brunch spreads, or individual desserts.
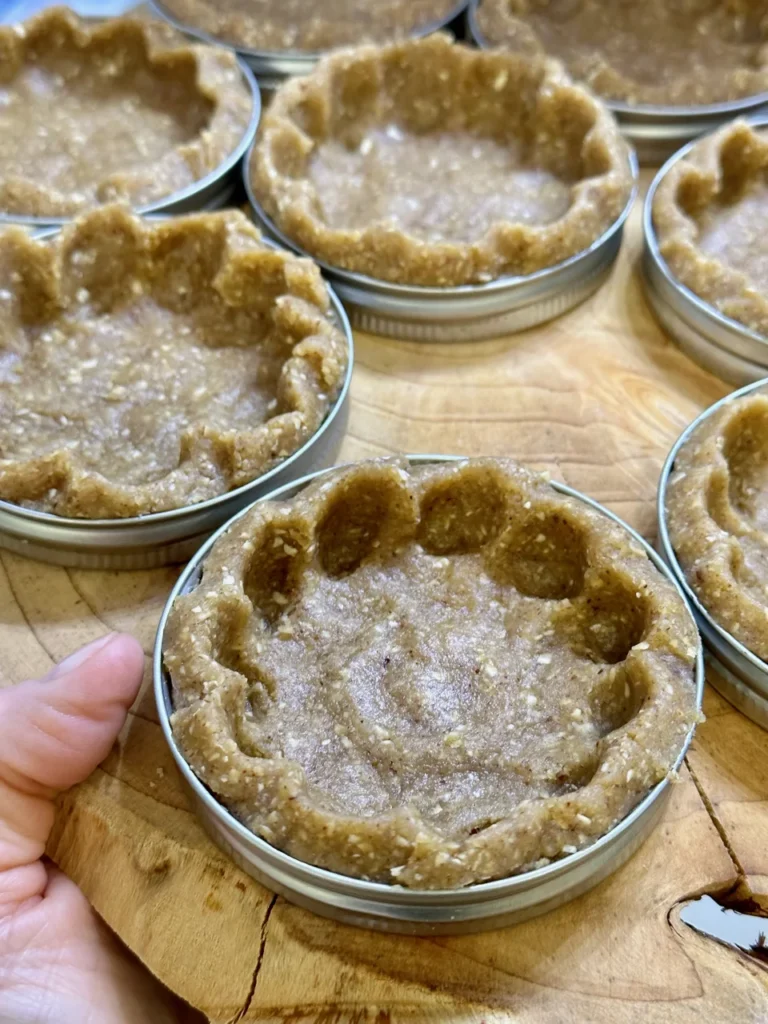
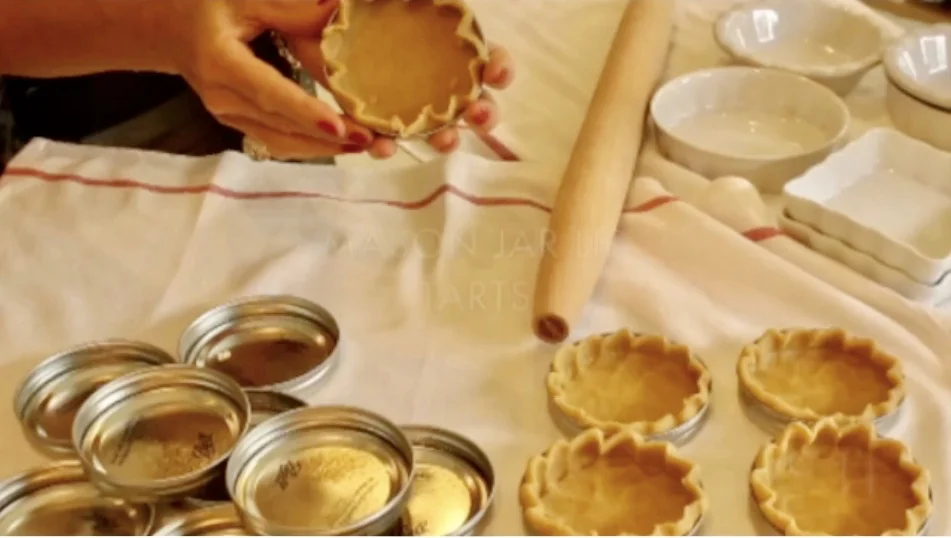
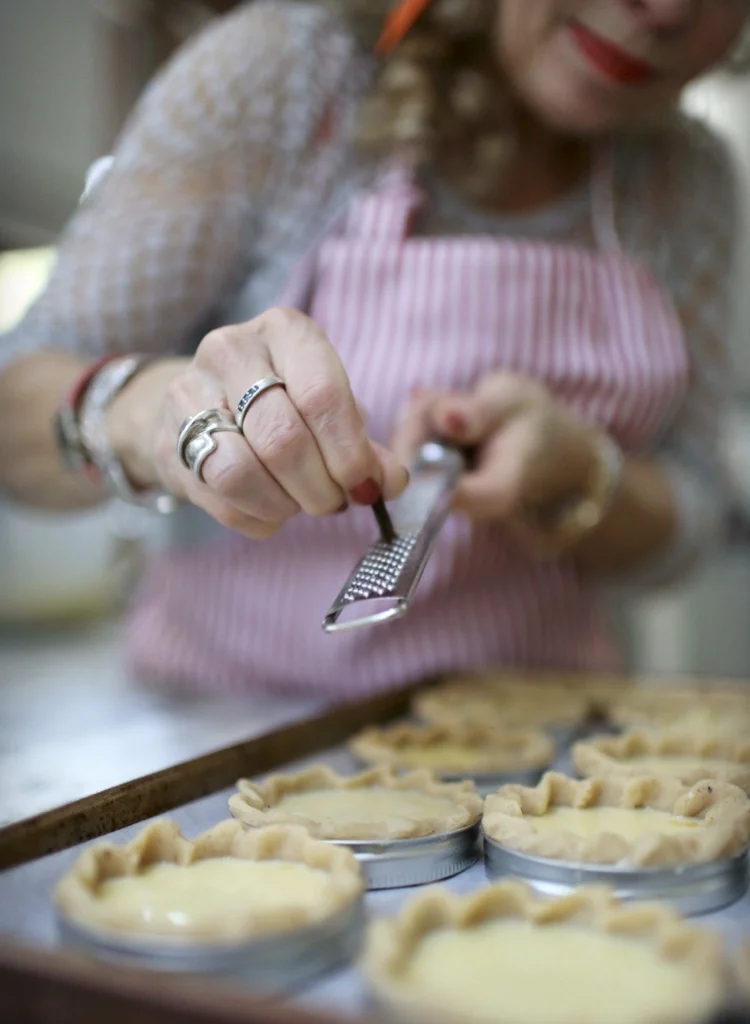
Mason jar lids (optional alternative) – A simple, creative option for shaping individual tart shells if you don’t have specialty pans.
Baking sheet – Placing tart pans on a baking sheet makes it easier to transfer them in and out of the oven while catching any overflow.
Parchment paper – Prevents sticking and helps ensure the tart shells release cleanly without breaking.
Whisk – Essential for creating a smooth, lump-free custard filling.
Wire cooling rack – Allows air to circulate around the tarts, helping them cool evenly and preventing soggy bottoms.
Pro Tips for Best Results
- Chill your tart dough before baking to prevent shrinking
- Use full-fat coconut cream for a stable dairy-free custard
- Avoid overfilling the shells, custard should sit about halfway up
- Let tarts cool completely before adding fruit for the best texture and presentation
How to Make Seasonal Fruit Tarts (step-by-step)
Step 1: Prepare the Tart Crust Dough
In a large mixing bowl or food processor, combine the flour and butter (or coconut oil). Cut the fat into the flour until the mixture resembles coarse crumbs.
Add the crushed nuts, sugar, and salt, and mix until evenly combined.
Whisk in the egg, then add cold water one tablespoon at a time, mixing gently until the dough comes together.
The dough should be:
- Soft but not sticky
- Easy to press and roll
- Not dry or crumbly
Tip: Proper hydration is key to creating a tender, flaky tart crust without overworking the dough.
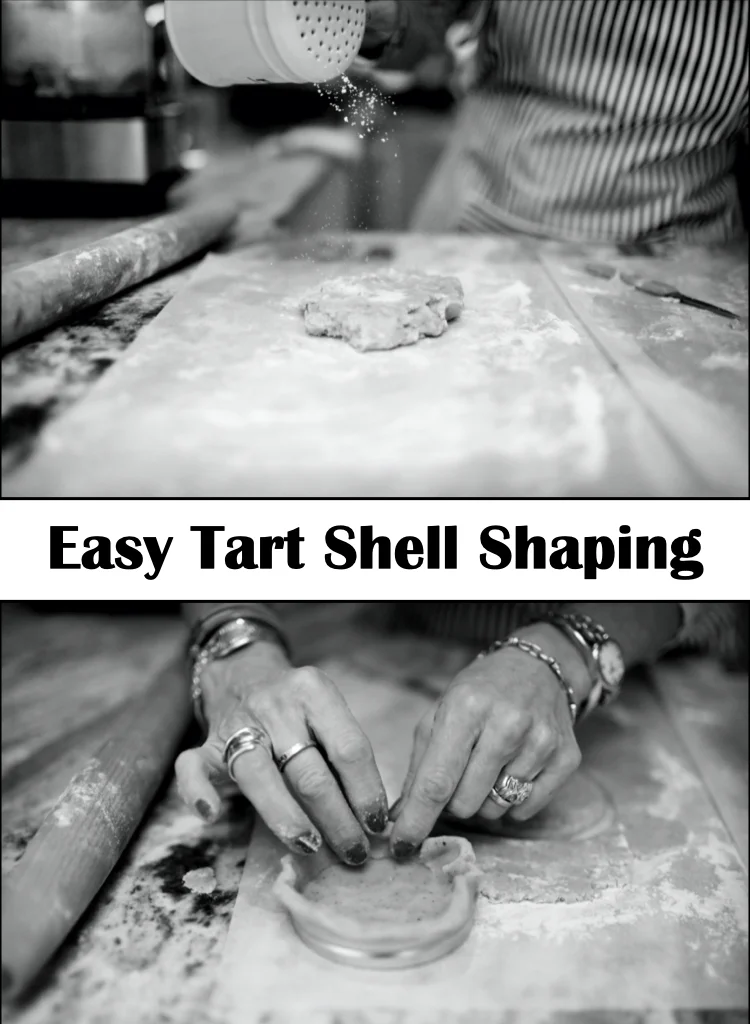
Step 2: Roll Out and Shape the Tart Shells
Transfer the dough to a lightly floured surface and roll it out to about ¼-inch thickness.
Gently press the dough into a tart pan or mini tart molds, making sure to:
- Press evenly along the bottom and sides
- Avoid stretching the dough (which can cause shrinking)
Trim excess dough and crimp the edges as desired.
Optional: Chill the tart shells for 15-20 minutes before baking to help maintain their shape.
Step 3: Make the Custard Filling
In a medium bowl, whisk together:
- Mascarpone or full-fat coconut cream
- Sugar
- Eggs
- Pinch of salt
- Vanilla, orange blossom, or citrus zest
Whisk until the mixture is smooth, light, and fully combined.
Tip: A well-mixed custard ensures even baking and a silky texture.
Step 4: Fill and Assemble the Tarts
Pour the custard into the prepared tart shells, filling each about halfway up the sides.
Do not overfill, as the custard will expand slightly during baking.
Place the tart pans onto a parchment-lined baking sheet for easy transfer.
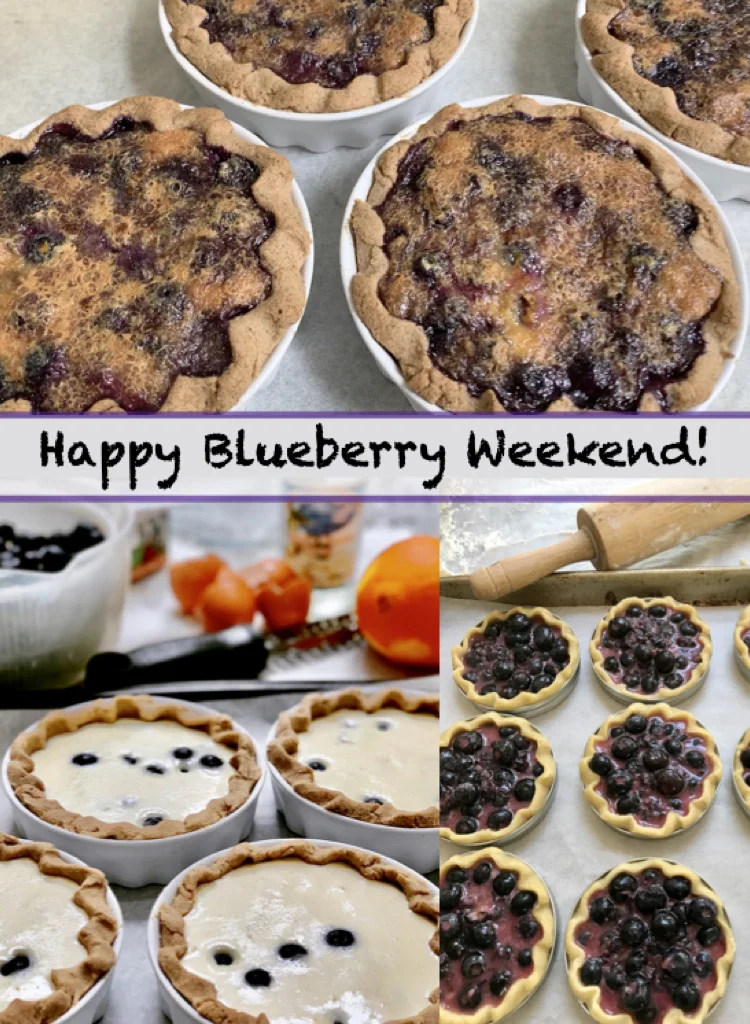
Step 5: Bake Until Golden and Set
Bake in a preheated 350°F oven for 20-25 minutes, or until:
- The crust is lightly golden brown
- The custard is set but still slightly soft in the center
Tip: The custard will continue to firm up as it cools, so avoid overbaking.
Step 6: Cool the Tarts Properly
Remove the tarts from the oven and transfer them to a wire cooling rack.
Allow them to cool completely before adding fruit.
Why this matters: Adding fruit too early can cause the custard to loosen and affect the final texture.
The exception would be peaches, which can actually caramelize while baking because of their high natural sugar content. A few fresh peaches can be added for presentation after baking.
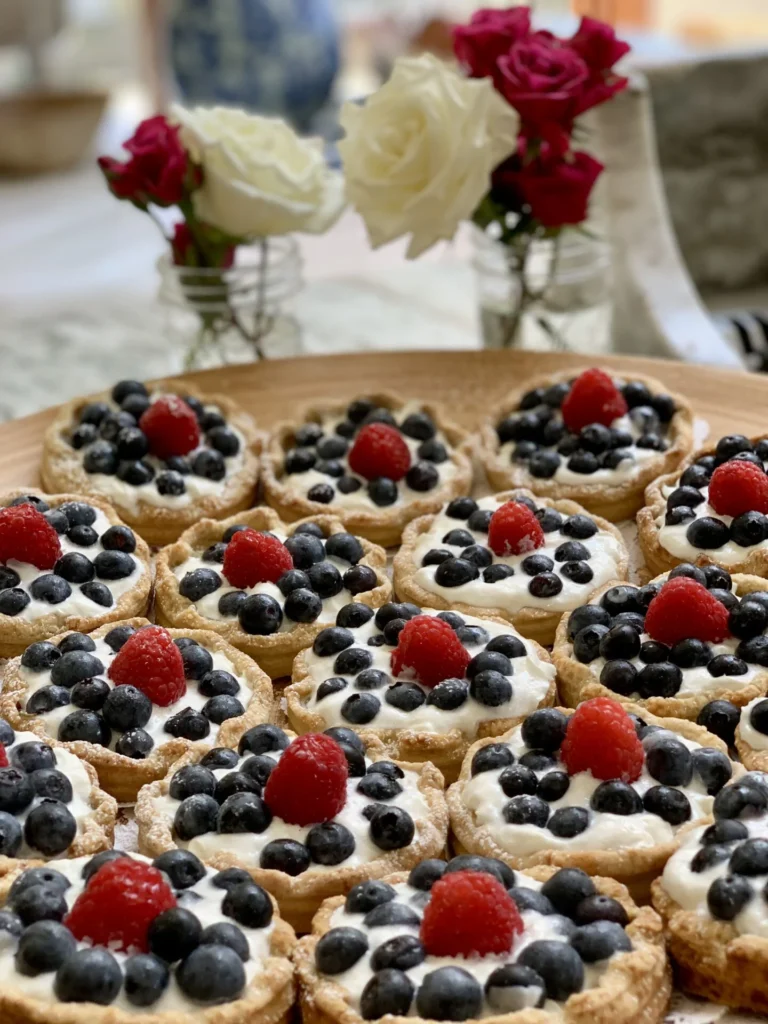
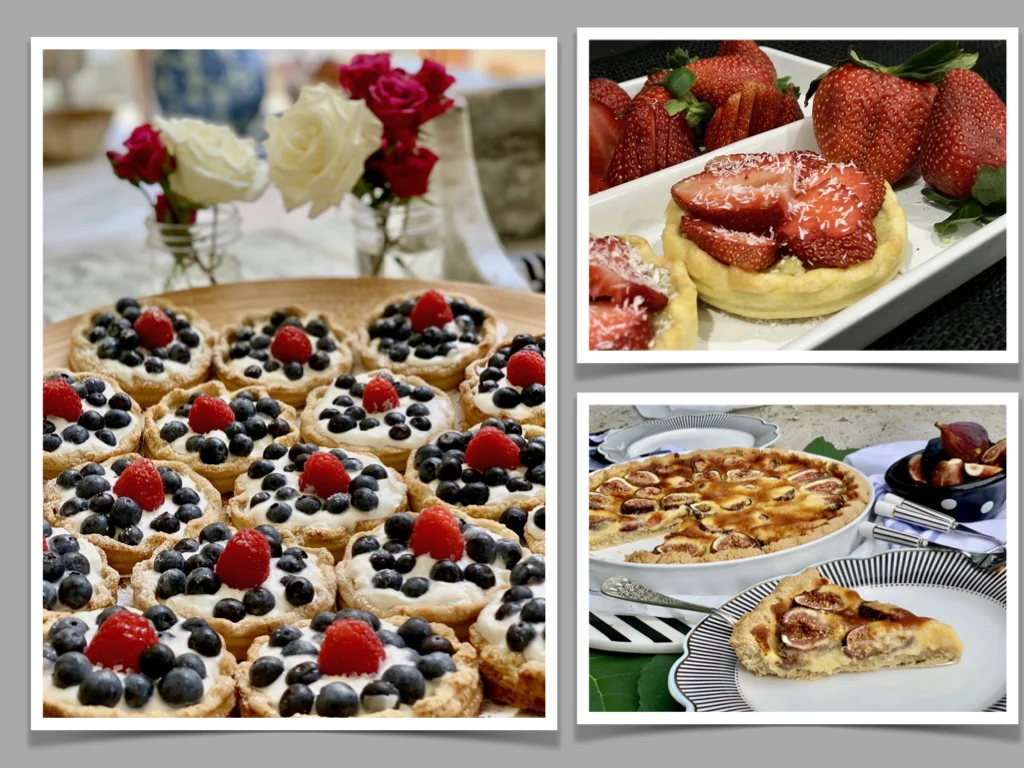
Step 7: Add Fresh Fruit and Finish
Top the cooled tarts with your choice of fresh strawberries, peaches, raspberries, or blueberries.
Finish with:
- A dusting of powdered sugar
- A light brush of warmed jam for shine
- A sprinkle of shredded coconut
Serve immediately or chill slightly before serving.
Frequently Asked Questions
Can I make these tarts ahead of time? Yes. Bake the crust and custard a day ahead, then add fruit just before serving.
Can I freeze the tart crust? Absolutely. Freeze unbaked shells in an airtight container.
What’s the best dairy-free substitute? Full-fat coconut cream works best for texture and stability.
Why is my crust too dry or too sticky? Adjust with small amounts of cold water or flour until balanced.
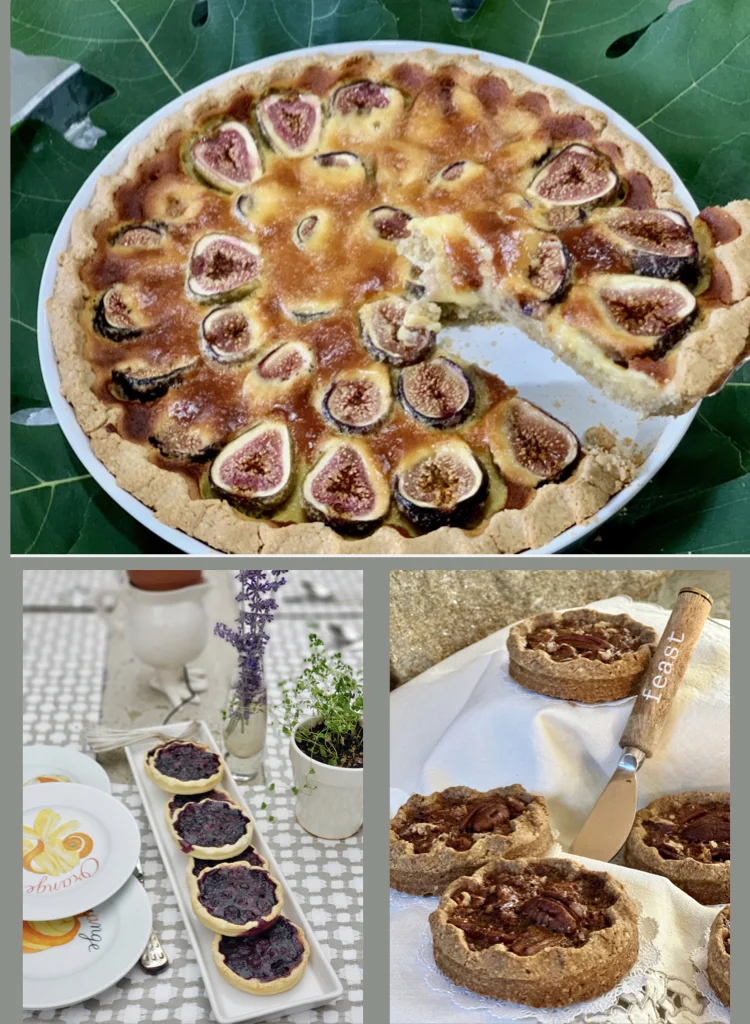
Can I use other fruits? Yes, blackberries, or figs work beautifully.
Seasonal Fruit Tarts (Dairy and Non-Dairy Custard Options)
Equipment
- 8 Removable bottom tart pans or Mason jar lids
- Rolling Pin
- Baking sheet pan
- Mixing bowl and whisk
Ingredients
- Crust
- 8 oz Butter or coconut oil cold
- 1 3/4 cups All-purpose flour or gluten-free more for dusting
- 1/2 cup Nuts, crushed see notes for nut allergies
- 2 tbsp Sugar
- 1/2 tsp Salt
- 1 Egg fork whipped
- 2-4 tbsp Cold water as needed
- Dairy or Non-Dairy Custard
- 8 oz Mascarpone or full fat coconut milk room temperature
- 1/2 cup Sugar
- 3 Eggs room temperature
- 1/4 tsp Salt
- 1/2 tsp Extract orange blossom or vanilla
- 1 tbsp Citrus zest (optional)
- Topping
- 1 1/2 cups Fresh fruit
- 1/2 cup Jam (optional)
- 2 tbsp Powdered sugar (optional)
Instructions
- Crust
- With a fork, or in a food processor, incorporate the butter (or coconut oil), into flour until mixture becomes like coarse meal.Add crushed nuts, sugar salt and mix.Incorporate the pre-mixed egg and 1 tablespoon of water at a time until the dough comes together. The dough should not be sticky nor dry. Balance water and flour to achieve this.
- Roll out the dough on a floured surface. Roll thinner than you ordinarily would a pie crust, about 1/8 inch thick.Press circles of dough with a cup the diameter of the sides-and-bottom of the lid or tart pan, about 4 inches (if using Mason jar wide-mouth lids), and press the rounds into the lid.Crimp the edges and the crust is ready to fill and bake, or freeze in an airtight container.
- Custard
- For a creamy filling, whisk the cream (of choice), sugar, eggs, salt and extract in a medium bowl until creamy and light. Pour evenly into prepared tart shells, about halfway up the sides. Transfer onto a parchment paper lined baking sheet.Bake about 20 – 25 minutes until pastry is golden brown and the custard is firm. Cool on a wire rack.
- Topping
- If using strawberries, slice them very thin and fan them on the tops of each baked tart, keeping the shape of the strawberry. If using berries, place them decoratively on the tops of the baked tarts. If dusting powdered sugar across the tops, do so just before serving. If brushing a jam across the fruit for added glaze, do so now.
Notes
If you make these seasonal fruit tarts, I’d love to see your version, whether you go classic with mascarpone or dairy-free with coconut cream.
Leave a comment below or tag me so I can see what fruits you chose. And if you’re saving recipes for spring and summer gatherings, don’t forget to pin this for later.
I believe the table... that place that draws people to gather, is the most powerful symbol of togetherness. All that happens before the table is set, the planning, the gathering, the preparing, are all an intricate part of the dance that create the mood of celebration to share with friends and loved ones.
The BEST desserts in spring and summer are these Fruit Tarts!